How to Install Loft Boarding Like a Pro: A Comprehensive Guide
Transform your attic into a practical storage space with our comprehensive loft boarding guide. Learn step-by-step how to install loft boards like a pro, ensuring safety, energy efficiency, and added home value.

Loft boarding is a practical way to maximize storage space in your home. Proper installation not only increases your storage capacity but also enhances the safety and energy efficiency of your property. Whether you’re a seasoned DIY enthusiast or tackling this project for the first time, this guide will walk you through the steps to install loft boarding like a professional. This comprehensive loft boarding guide will ensure you achieve optimal results.
Why Loft Boarding Matters
Loft boarding provides an excellent solution to declutter your living spaces by utilizing underused attic areas. Additionally, it can improve insulation, reduce energy costs, and increase the resale value of your home. A well-executed loft boarding project ensures safety and durability, making it an essential upgrade for many homeowners.
Preparation: Setting the Stage for Success
Before diving into the installation process, proper preparation is crucial. Here's what you need to do:
Assess Your Loft Space
-
Inspect the Loft Structure
-
Check the loft’s load-bearing capacity.
-
Identify any structural weaknesses or repairs required.
-
-
Measure the Space
-
Take accurate measurements of the floor area you plan to board.
-
Consider obstacles like pipes, wiring, and beams.
-
Choose the Right Materials
-
Boards: Opt for high-quality chipboard or tongue-and-groove boards. These materials are durable, cost-effective, and provide a sturdy surface for storage.
-
Supports: Use loft legs or raised flooring systems to maintain insulation. These systems ensure that the insulation beneath the boards remains uncompromised, preserving energy efficiency.
-
Fasteners: Gather screws, nails, and other essentials to secure the boards properly.
Gather Necessary Tools
You will need:
-
Measuring tape
-
Screwdriver or drill
-
Saw
-
Safety gear (goggles, gloves, dust mask)
-
Insulation materials
-
Ladder or scaffolding
Ensure Safety Precautions
-
Wear protective gear to prevent injuries from tools or materials.
-
Check for electrical wiring and pipes before drilling to avoid damage or hazards.
-
Use a sturdy ladder or scaffolding to access the loft safely.
-
Ensure adequate lighting in the loft to work comfortably and spot potential obstacles.
Step-by-Step Guide to Loft Boarding Installation
Step 1: Clear the Loft Space
Remove any stored items and debris from the loft. This ensures an unobstructed workspace and minimizes the risk of accidents. Take this opportunity to evaluate the condition of the joists and identify any areas that may need repairs.
Step 2: Install Insulation
-
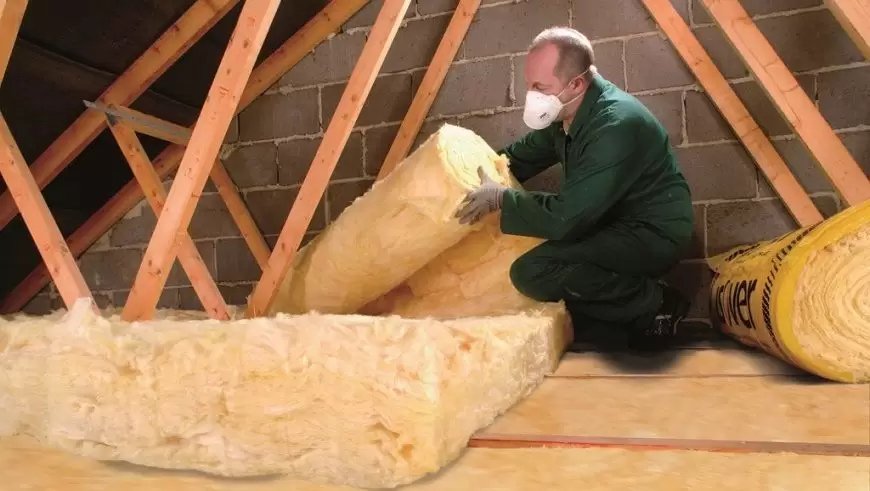
Lay insulation material between the joists. Ensure the material is evenly distributed to cover the entire area effectively.
-
Use insulation rolls or boards with an appropriate thickness to comply with building regulations.
-
Avoid compressing the insulation, as this reduces its effectiveness. Proper insulation not only keeps your home warm but also prevents heat loss, saving you money on energy bills.
Step 3: Fit Loft Legs or a Raised Floor System
-
Why Raised Flooring is Necessary
-
Prevents insulation compression, maintaining its thermal properties.
-
Allows for proper ventilation, reducing the risk of dampness and mold.
-
-
Installation Steps
-
Position loft legs on the joists, spacing them evenly to support the boards effectively.
-
Secure the loft legs with screws, ensuring they are tightly fixed.
-
Double-check the alignment and spacing of the loft legs to ensure a level surface.
-
Step 4: Lay the Boards
-
Start at a Corner
-
Begin in the farthest corner of the loft, working your way outwards. Starting in a corner ensures you have a systematic approach, minimizing errors.
-
-
Align and Secure the Boards
-
Place the first board on the loft legs and align it carefully to ensure a straight start.
-
Use screws to secure the board in place. Drive the screws gently to avoid splitting the boards.
-
Repeat the process, leaving a small gap between boards for expansion due to temperature changes.
-
-
Cut Boards to Fit
-
Use a saw to cut boards to size around obstacles such as beams, pipes, or vents.
-
Ensure precise measurements for a snug fit, avoiding gaps that could compromise the stability of the flooring.
-
Step 5: Add Finishing Touches
-
Sand any rough edges to prevent splinters or injuries.
-
Vacuum the area to remove dust and debris, leaving a clean and polished finish.
-
Test the stability by walking carefully over the boards. Ensure there are no creaks or movements, as these indicate areas that may need additional support.
Tips for Professional Results
Plan for Future Access
-
Install an access hatch if one doesn’t exist. A well-placed hatch makes it easier to enter the loft for future maintenance or storage.
-
Ensure the boarding allows for easy access to wiring, pipes, and other essential utilities. This avoids complications during repairs or upgrades.
Maximize Storage Space
-
Incorporate shelving or modular storage systems to keep the area organized.
-
Use labeled boxes for better organization and easy retrieval of items.
-
Consider the weight distribution of stored items to avoid overloading any specific area.
Maintain Ventilation
Proper ventilation prevents dampness and mold growth. Avoid sealing the loft too tightly, as this can lead to condensation and structural issues over time. Use breathable materials where possible to enhance airflow.
Work with a Partner
Having an extra set of hands can make the process faster and safer. One person can hold boards in place while the other secures them, ensuring precision and efficiency.
Benefits of Loft Boarding
Enhanced Storage
Loft boarding creates a functional storage area, freeing up valuable space in other parts of your home. By organizing your belongings effectively, you can make your living areas more spacious and clutter-free.
Energy Efficiency
By maintaining proper insulation, you can reduce energy consumption and save on heating bills. Loft boarding helps trap heat within your home, making it an eco-friendly and cost-effective upgrade.
Increased Property Value
A boarded loft adds utility and appeal, which can attract potential buyers if you decide to sell. It demonstrates thoughtful home improvements, which are always attractive to prospective homeowners.
Conclusion
Installing loft boarding like a pro is achievable with the right preparation, materials, and techniques. By following this comprehensive loft boarding guide, you can create a safe, durable, and practical storage space in your loft. Whether you’re looking to organize your belongings or improve your home’s energy efficiency, loft boarding is a worthwhile investment. If you’re unsure about any aspect of the process or prefer professional assistance, consider reaching out to Victorian Insulation. Their expertise in loft boarding and insulation ensures a flawless finish that meets your needs.
FAQs
1. How much weight can a boarded loft hold?
The weight capacity depends on the structural integrity of your loft and the materials used. Always check the joist strength before adding heavy items. Consult a professional if you plan to store exceptionally heavy items.
2. Can I board my loft without compromising insulation?
Yes, using loft legs or raised flooring systems helps maintain insulation thickness and airflow. This ensures your home remains energy-efficient while providing additional storage space.
3. How long does it take to board a loft?
The time required depends on the loft size and your experience. Most DIY projects take 1-2 days. Hiring a professional can speed up the process while ensuring high-quality results.
4. Do I need a building permit for loft boarding?
In most cases, you don’t need a permit for standard loft boarding. However, consult local regulations if you plan significant structural changes or if your home is in a conservation area.
5. Why should I hire Victorian Insulation for loft boarding?
Victorian Insulation provides professional loft boarding and insulation services, ensuring high-quality results tailored to your home’s requirements. Their team of experts prioritizes safety, efficiency, and customer satisfaction, making them a trusted choice for homeowners.
What's Your Reaction?


