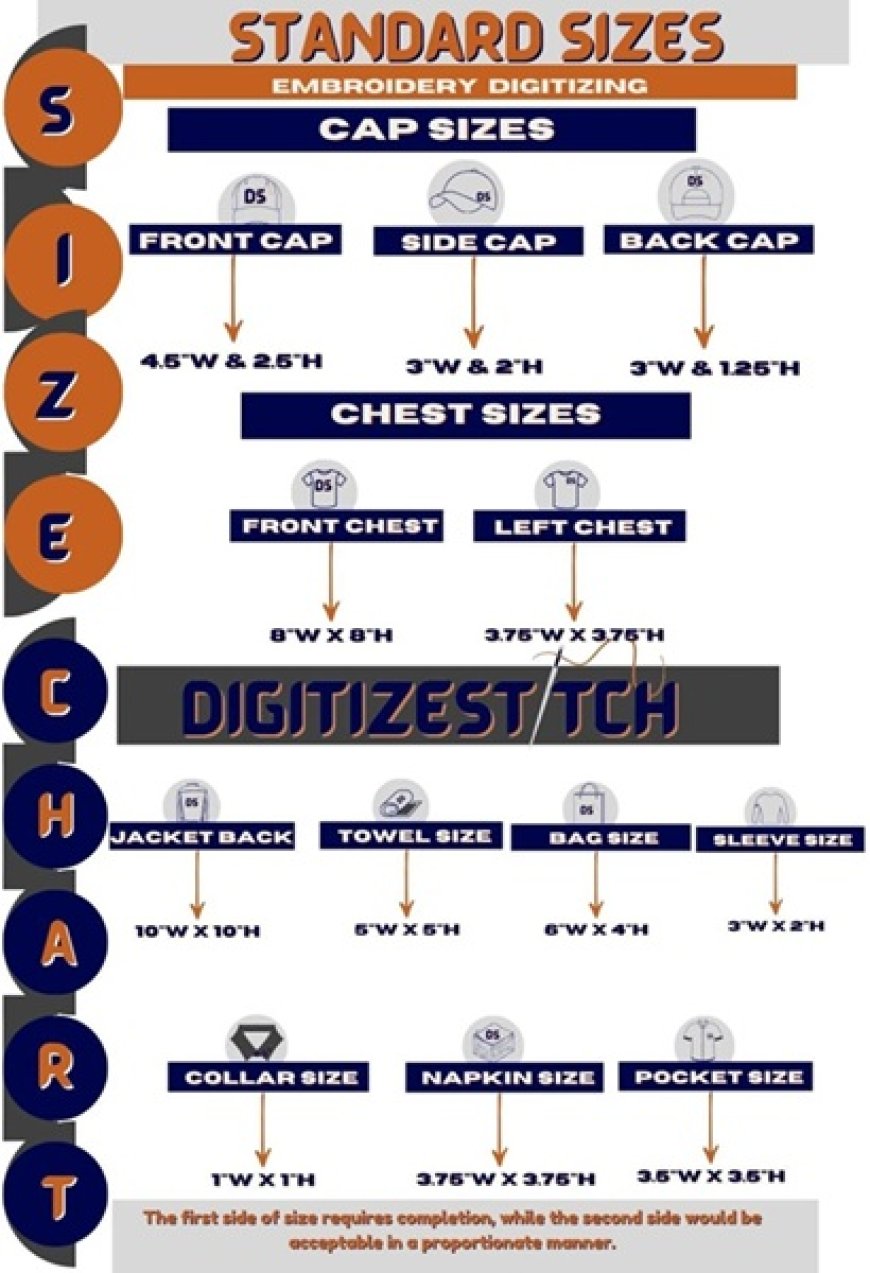
How To Use An Embroidery Size Chart?
How To Use An Embroidery Size Chart? Embroidery is a creative way to add designs to fabrics, but getting the size right can be tricky.

Different Uses Of Embroidery Size Chart
Embroidery is a creative way to add designs to fabrics, but getting the size right can be tricky. An embroidery size chart helps you pick the perfect size for your designs. It ensures they look great and fit perfectly. This guide will show you how to use an embroidery size chart. It will also give tips for successful embroidery projects.
1. What Is An Embroidery Size Chart?
An embroidery size chart gives standard measurements for embroidery designs on various items. It shows you the recommended sizes for embroidery on items like hats, shirts, bags, and more. This chart is vital for all embroiderers. It simplifies the process of sizing designs.
2. Why Is An Embroidery Size Chart Important?
Using an embroidery size chart is crucial for achieving professional-looking results. It prevents designs from being too large or too small for the item you are embroidering. The chart also helps maintain design clarity, especially for intricate patterns. The size chart ensures a perfect fit. Use it for both digitizing for embroidery and working on a pre-made design.
3. How To Read An Embroidery Size Chart
Understanding how to read an embroidery size chart is simple. Most charts include:
· Item type: Lists common items like shirts, caps, or jackets.
· Placement area: Shows specific locations, such as chest, sleeve, or back.
· Recommended size: Provides dimensions in inches or centimeters.
For example, a size chart might suggest a 3x3-inch design for a left chest logo on a polo shirt. By following these guidelines, you can ensure your design looks balanced and professional.
4. Steps To Use An Embroidery Size Chart
Here are the steps to use an embroidery size chart effectively:
Step 1: Identify Your Item
First, decide what item you’re embroidering. Different items have different size recommendations. For instance, a cap requires smaller designs than a tote bag.
Step 2: Choose The Placement
Next, select where you want the design to appear. Common placements include the chest, back, sleeves, or front panels of a cap.
Step 3: Check The Chart
Check the embroidery size chart for the recommended size for your item and placement. This ensures the design fits the area without looking too small or overpowering.
Step 4: Adjust As Needed
If your design is highly detailed, consider sizing up slightly to ensure clarity. Conversely, for simple designs, you may stick to the chart’s exact recommendations.
Step 5: Test The Size
Before starting the embroidery process, test the design size on a sample fabric. This allows you to see how it looks and make adjustments if necessary.
5. How To Digitize For Embroidery
When creating custom designs, learning how to digitize for embroidery is essential. Digitizing converts an image into a format that an embroidery machine can read. Here’s how it works:
Step 1: Choose Your Software
Select embroidery digitizing software that fits your skill level and needs. Popular options include free and paid programs with various features.
Step 2: Upload Your Design
Import the design you want to digitize into the software. Make sure it’s high-quality and clear.
Step 3: Set The Size
Use the embroidery size chart to determine the appropriate size for your design. Enter these dimensions in the software to ensure accuracy.
Step 4: Add Stitch Types
Assign different stitch types to parts of the design. For example, use satin stitches for borders and fill stitches for larger areas.
Step 5: Preview And Save
Preview the digitized design to ensure everything looks correct. Save the file in a format compatible with your embroidery machine.
Using custom embroidery digitizing services USA can simplify this process. These services ensure your design is professionally digitized and optimized for embroidery.
6. Tips For Using An Embroidery Size Chart
To make the most of an embroidery size chart, follow these tips:
· Keep it handy: Print out the chart or save it on your device for easy reference.
· Consider the fabric: Different fabrics react differently to embroidery. A size that works for canvas might not work for silk.
· Don’t overcrowd: Leave some space around the design to avoid a cramped look.
· Ask for help: If you’re unsure, consult a professional or use digitizing services.
7. Common Mistakes To Avoid
When using an embroidery size chart, avoid these common mistakes:
· Ignoring the chart: Skipping the chart can lead to designs that don’t fit or look awkward.
· Not testing the size: Always test the design size on scrap fabric before finalizing.
· Choosing the wrong placement: Double-check the placement to ensure the design looks balanced.
8. Benefits of Using Custom Embroidery Digitizing Services USA
Custom Embroidery digitizing services USA offer several advantages, including:
· Accuracy: Ensures your design fits perfectly and maintains clarity.
· Expertise: Professionals know how to optimize designs for various fabrics and sizes.
Time-saving: Saves you the effort of learning digitizing software.
What's Your Reaction?


